
Every clinician has the same problem: you understand the concept perfectly, but your patient doesn't. You draw on a napkin. You use analogies. You pull up a stock image that looks like it's from a 2005 textbook. None of it clicks.
I started using AI image generators to create custom patient education illustrations, and it changed how I run consults. Not because the technology is revolutionary -- but because I can now generate exactly the visual I need, in under a minute, for the exact concept I'm trying to explain.
This article gives you the reusable prompt template I use, shows you the results, and walks you through how to build your own.
The Tool: Nano Banana Pro via Gemini
Every illustration in this article was generated with Nano Banana Pro, which you can access through gemini.com. Open a chat, type your prompt in the chatbox, and it generates the image right there. No special setup, no separate app.
The Method: One Prompt Template, Infinite Subjects
The trick is separating what you want to show from how you want it to look. I write a one-line subject describing the medical concept, then append the same style instructions every time. The result is a consistent, professional visual language you can reuse across an entire slide deck.
Here's how it works:
Step 1: Write your subject -- what you need the patient to understand.
Step 2: Append the master style block below.
Step 3: Generate. Review for accuracy. Iterate if needed.
That's it. The style block does the heavy lifting.
The Master Style Prompt
This is the template I append to every subject. Copy it, save it somewhere, and reuse it.
The style should be a simplified, softened version of Frank Netter's anatomical illustrations or JAMA patient education format -- accurate in structure and spatial relationships, but rendered with lighter line work, gentler shading, and a warmer color palette. Use clean labeled anatomy with thin leader lines pointing to key structures. Colors should be naturalistic but slightly muted and approachable (not harsh reds or clinical blues). Tissues should have subtle gradient shading to convey depth and dimension without photorealism. Remove all surrounding clutter -- isolate the anatomy on a clean white or very light background. The overall feel should be educational and clear enough for a patient to look at and immediately understand what they're seeing, like a page from a patient-friendly anatomy handbook. No cartoon characters, no metaphors -- just clean, honest, gently rendered anatomy. No detailed anatomy labels unless indicated.
Why this works: the Netter reference anchors the AI to a specific visual tradition -- accurate, dignified, educational. The warm palette and "no cartoon characters" guardrails keep it professional. Patients trust these images because they look like real medical illustrations, not clip art.
Demo: Four Subjects, Same Prompt
Below are four illustrations from a 16-slide head and neck radiation therapy deck I use in clinic. Every image was generated by writing a short subject line and appending the master prompt above.
The Cancer Care Journey
Subject: "Show a patient's cancer care journey: naming (biopsy + microscope), to staging (looking around the body for spread), to developing a treatment plan (multi-team discussion)."
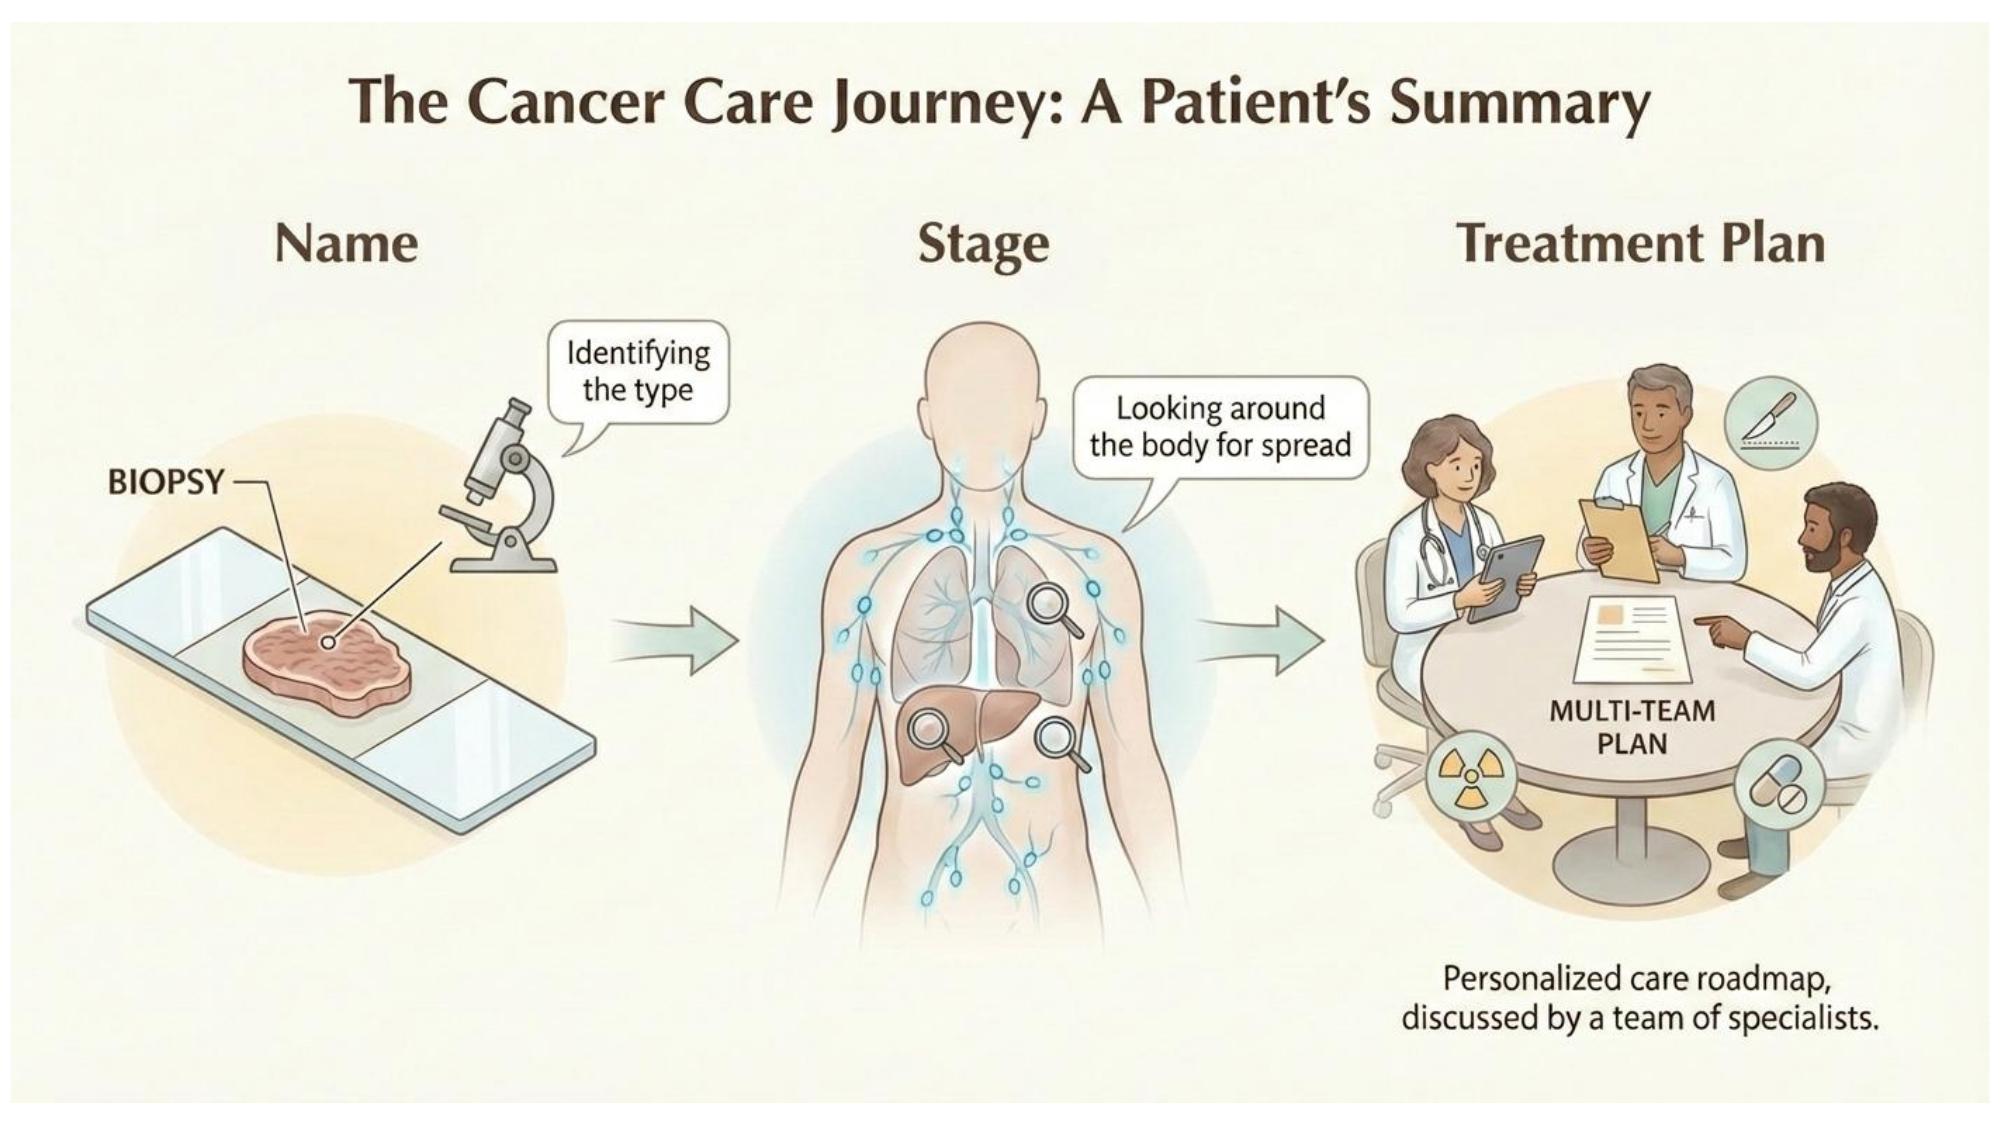
Subject: cancer care overview. Same style prompt.
Radiation Fractionation
Subject: "Explain radiation fractionation using a pie/cake analogy. Complete pie on the left labeled 'Your Treatment Plan,' slices delivered one at a time across a timeline (each labeled 'Daily Treatment'), reassembled at the right labeled 'Total Dose Delivered.' Include the note: 'Same recipe, same slices, delivered one piece at a time.'"
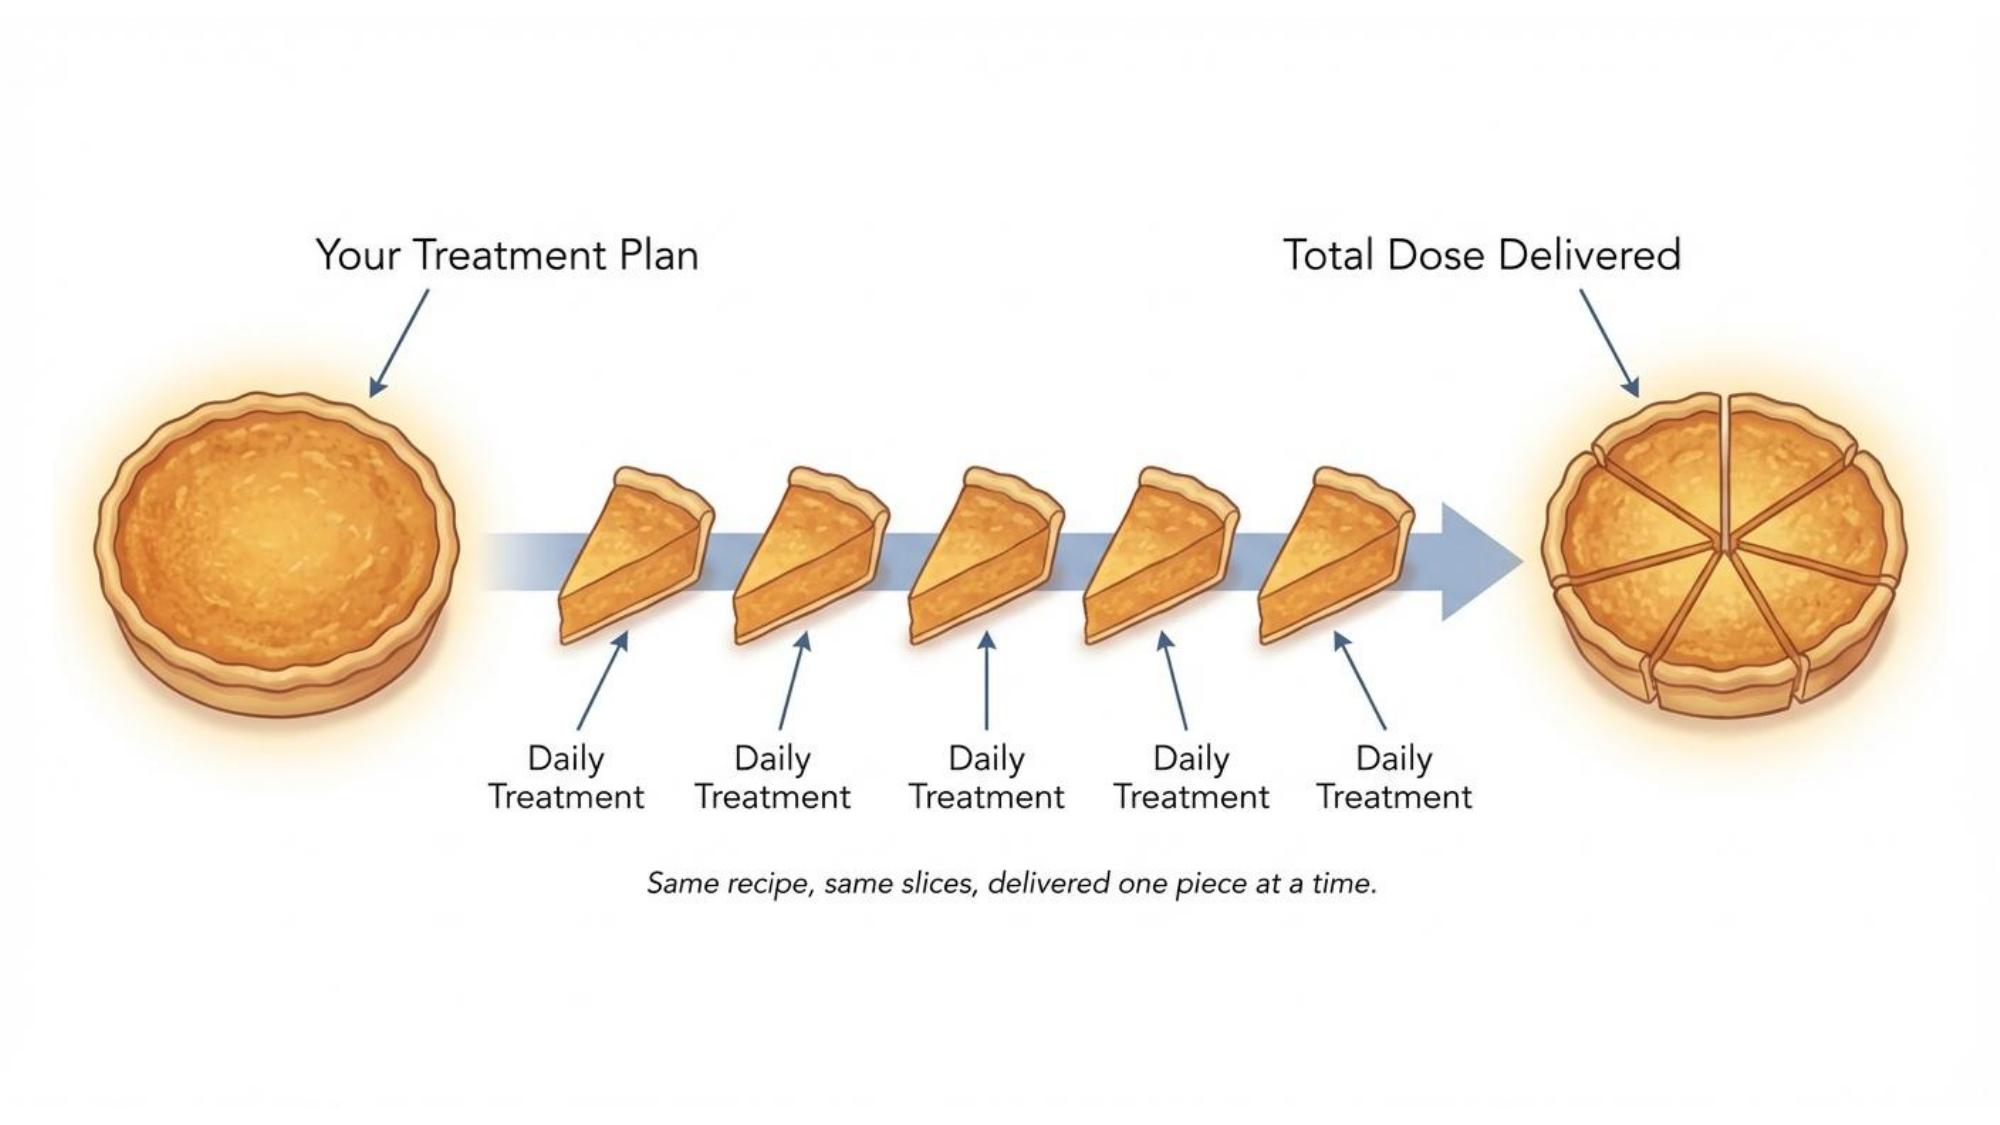
Subject: fractionation concept. Same style prompt.
The Immobilization Mask
Subject: "Show a 5-point thermoplastic radiation mask for head and neck treatment. Patient lying supine with the mesh mask secured over head, face, and upper shoulders, pinned to a board. Label the mask, head support, bite block, and target area."
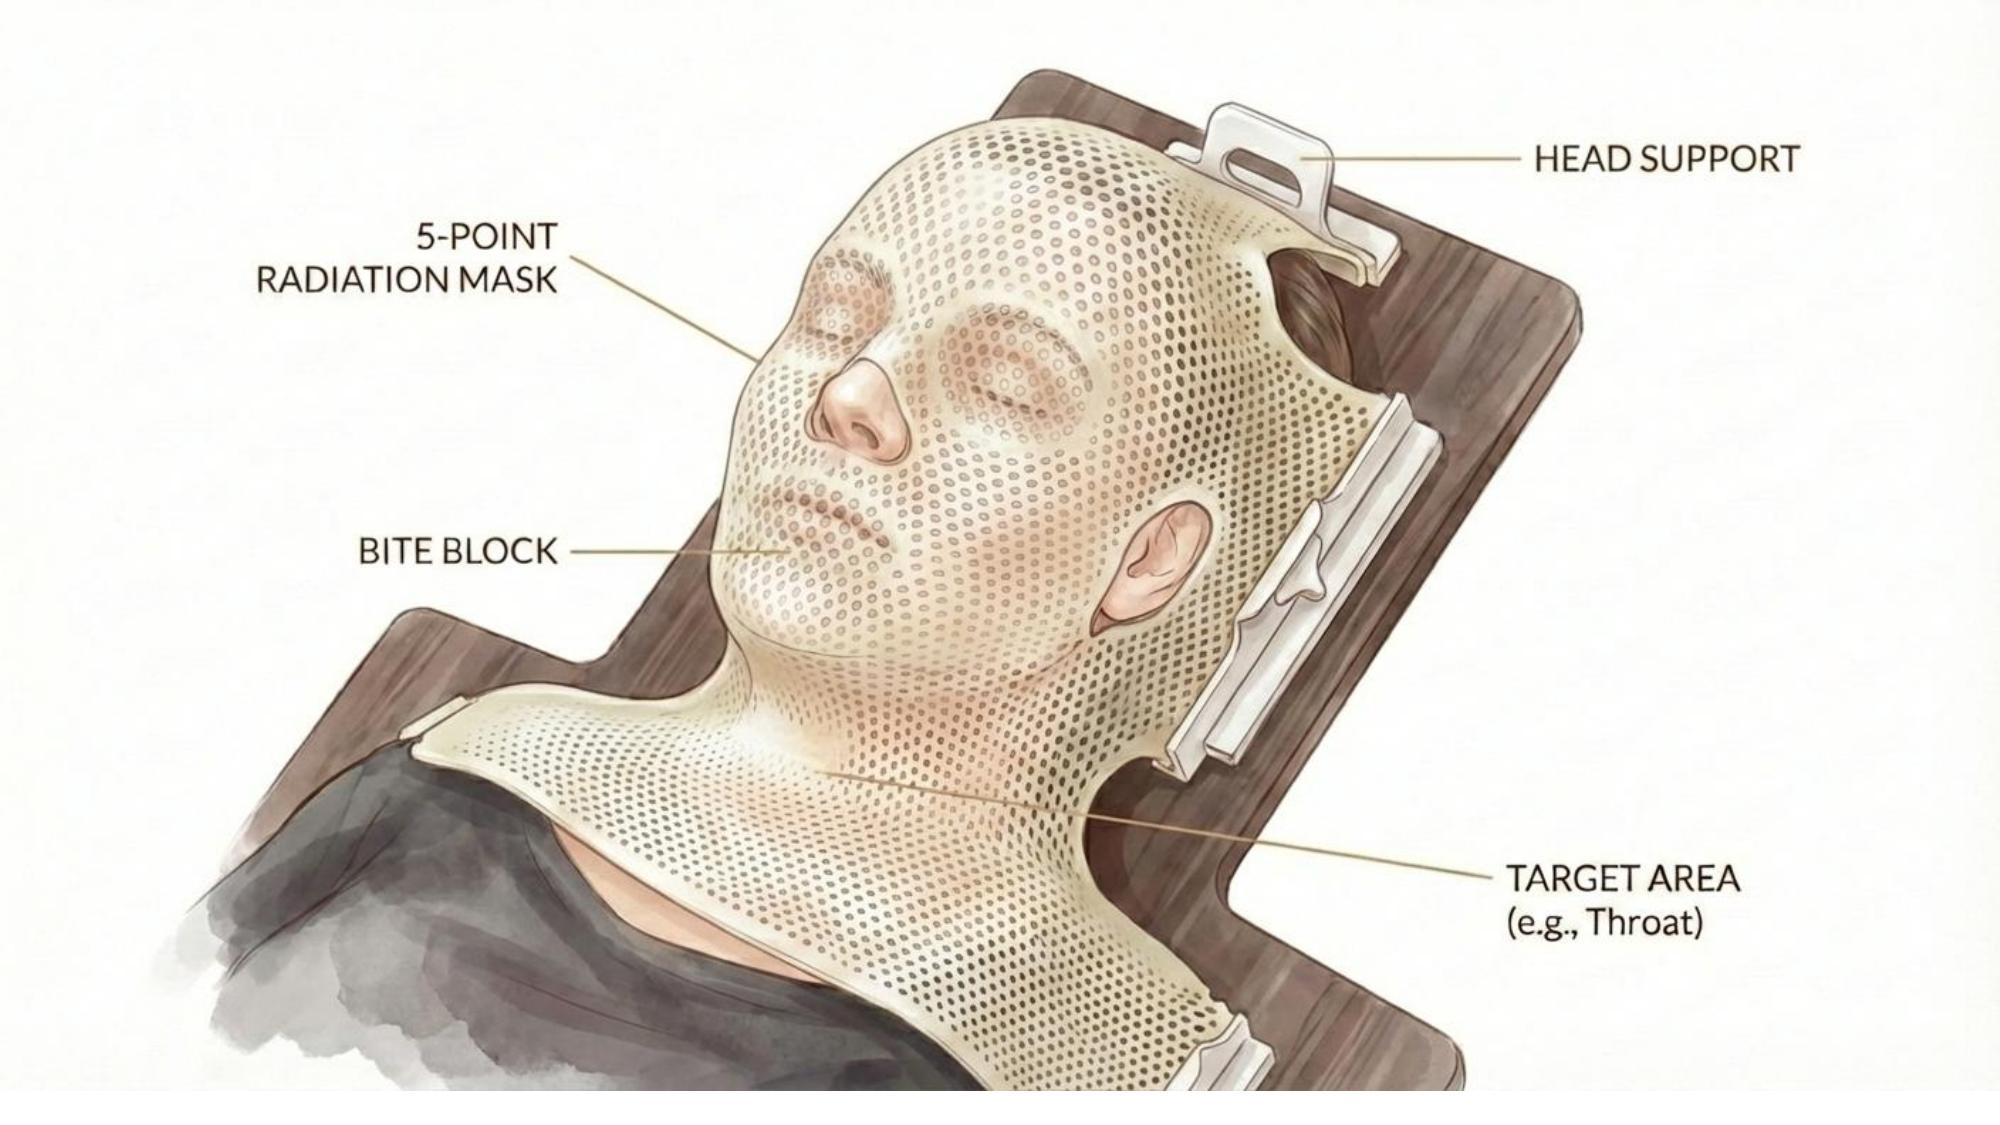
Subject: immobilization equipment. Same style prompt.
Skin Changes Timeline
Subject: "Show the trajectory of skin erythema during head and neck radiation. Six heads in a horizontal timeline: Week 1 (healthy, radiation field outlined), Week 2 (faint erythema), Week 3 (moderate), Week 5-6 (peak with desquamation), post-treatment (healing), post-treatment (resolved with residual pigmentation)."
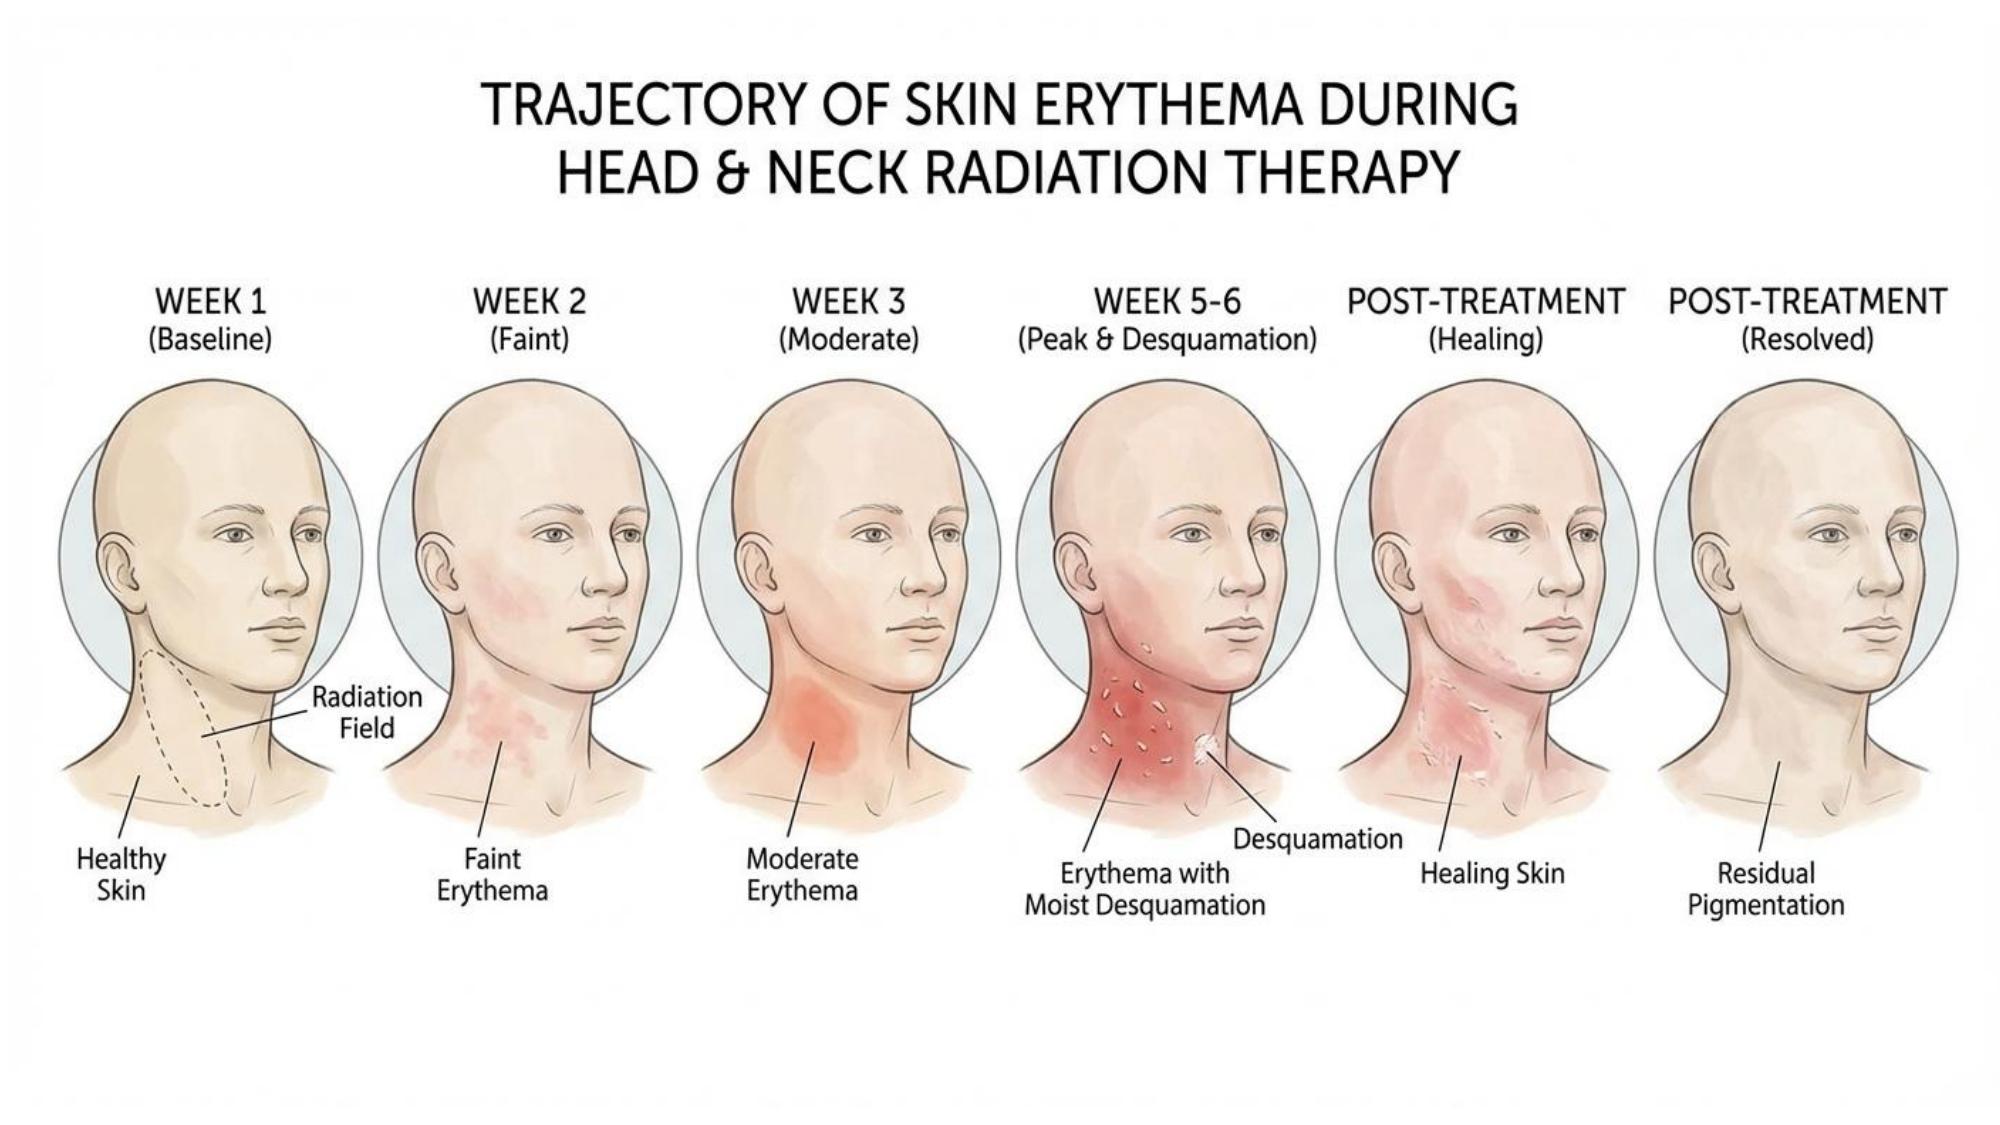
Subject: side effect timeline. Same style prompt.
Tips for Getting Good Results
What Makes a Good Subject Line
Be specific about the medical concept, the layout you want (timeline, side-by-side, labeled diagram), and what should be labeled. The style prompt handles the aesthetics -- your subject line handles the content and composition.
Be explicit about layout. "Show a timeline" or "side-by-side comparison" or "three-column flow" tells the AI how to organize the information spatially.
Name what to label. If you want structures labeled, say so. If you don't, say "no detailed anatomy labels unless indicated." The AI will follow whichever you specify.
Attach reference images when the prompt isn't enough. The 5-point mask was horrendous on the first few tries -- no amount of text prompting fixed it. So I found a real photo on Google, attached it to the chat, and asked the model to use it as a reference. That worked immediately. If you're struggling to describe something complex, show it.
If it's not working, start a new chat. This is a big one. If you've been iterating in the same conversation and the results keep getting worse, the model is pigeonholed -- it's stuck in the context of your previous attempts. Open a fresh chat, paste your prompt clean, and try again. You'll often get a better result on the first try.
Always verify accuracy. AI image generators can produce anatomically incorrect illustrations. You are the quality gate. Never show a patient something you haven't checked.
Using LLMs for Text-Based Patient Education
Image generation is half the toolkit. The other half is using LLMs to reframe concepts on the fly.
When a patient isn't getting it, I open ChatGPT or Claude and type something like:
"Explain radiation therapy to a 70-year-old farmer who's never heard of it before. Focus on what it feels like day-to-day. Skip the physics."
The key: be specific about your patient and what they need to understand. A prompt that says "explain radiation" gives you a textbook answer. A prompt that says "explain radiation to a claustrophobic 45-year-old who's worried about the mask" gives you something you can actually use in the room.
Getting Started
- Copy the master style prompt above.
- Pick one concept your patients struggle with.
- Write a subject line describing the visual you need. Be specific about layout and labels.
- Append the style block. Generate.
- Review for accuracy. Iterate if needed.
- Save what works. Build your library over time.
You don't need to build a 16-slide deck overnight. Start with one image that replaces one bad explanation. Then do it again.